Writing, note taking, task and file management in one app.
Notebooks for Mac
Notebooks for Mac
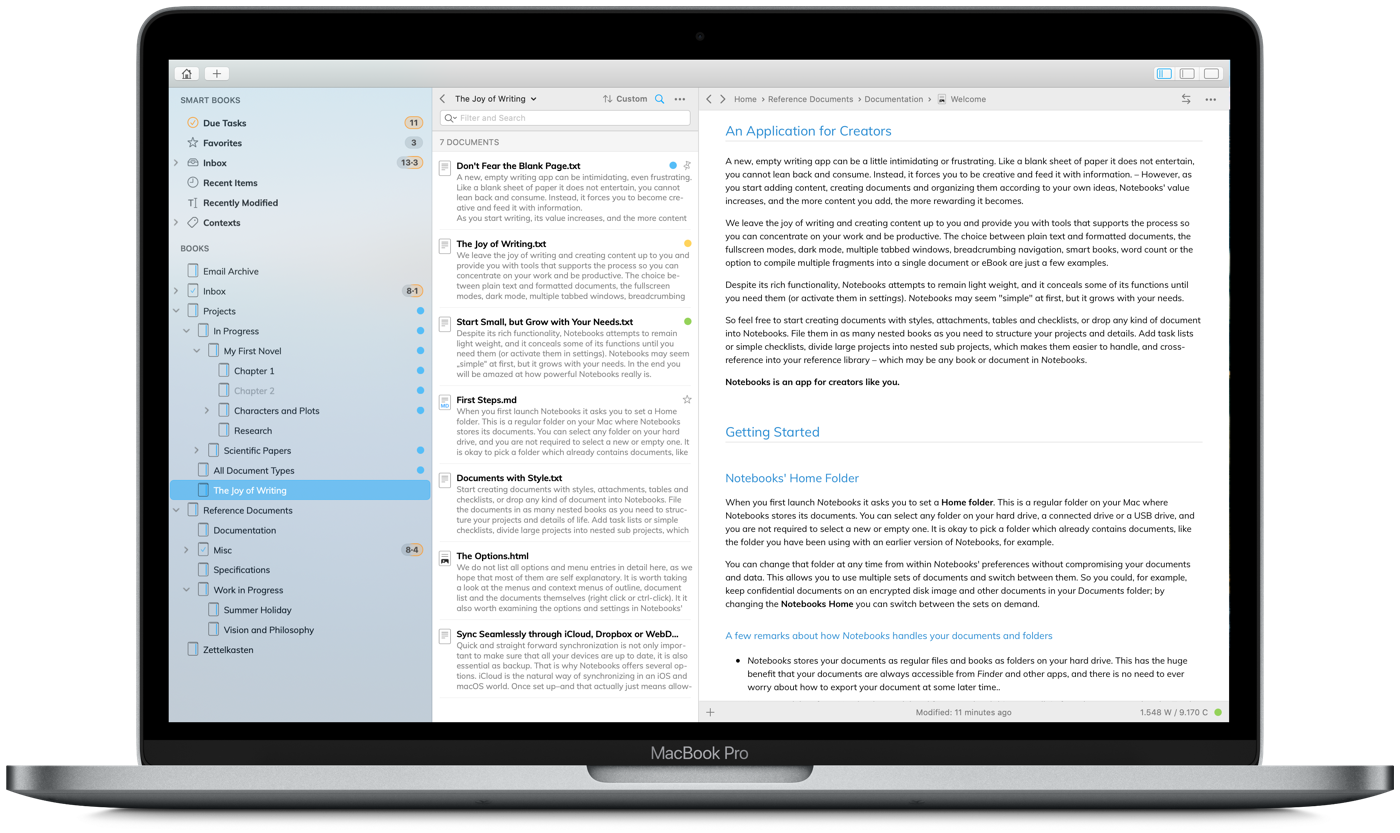
Start creating documents with styles, attachments, tables and checklists, or drop any kind of document into Notebooks. File them in as many nested books as you need to structure your projects and details. Add task lists or simple checklists, divide large projects into nested sub projects, which makes them easier to handle, cross-reference into your reference library – which may be any book or document in Notebooks – and Notebooks for Mac may soon become the central repository for everything you want to keep close at hand.
Notebooks for Mac provides all the tools you need to concentrate on your work and be productive – on your Mac. Formatted documents, plain text and Markdown, the fullscreen modes, dark mode, multiple tabbed windows, breadcrumbing navigation, smart books, word count or the option to compile multiple fragments into a single document or eBook are just a few examples.
Of course you can synchronize the contents of Notebooks between your iPad, iPhone and your Mac, so you can seamlessly work on your documents on any device.
Notebooks for Mac 3 is a major update with countless improvements and innovations. It is a free upgrade for users of Notebooks for Mac 2.
New in Notebooks for Mac 3
The new versions welcome you with a fresh App Icon, refined book and document icons and a modernized appearance.
With a simple gesture you can mark books and documents as Favorites, which adds them to a new smart book at Notebooks’ top level. Favorites are like a shortcut to items you need to access frequently, or a quick collection of items you want to temporarily group together for creating an eBook or a PDF, for example.
You can pin documents to the top of the list, independent of the selected sort order. On an iPad, Notebooks can automatically display a book’s first pinned document as index or default document.
It is easier than ever to select any book within Notebooks as Default Inbox. The inbox can appear as smart book, so even a deeply nested inbox is quickly available from the top level. Notebooks also uses different inboxes for different storage locations.
Internal link and Wiki links resolve even smarter. With just a title or part of a filename given, Notebooks can find the target, no matter where it is located. So you are no longer forced to enter the full path – although you still can.
Notebooks now supports Automatic Link Management. This makes sure that links don’t break when you move or rename books and documents.
Documents can have Backlinks, which makes it easy to see which other documents are referencing or mentioning them.
To enter the path for a link, hit or tap the TAB button for a list of auto complete suggestions. This makes it much easier to add the path to any document within Notebooks.
The same auto complete is available for context tags, too.
If you are into screen writing you will be happy to hear that Notebooks now supports Final Draft documents. They display in a perfectly rendered layout, including scene numbers.
The full list of changes and additions is available in a dedicated article.
Notebooks for Mac 3 requires macOS 10.12 or later, and for best experience, Spotlight search should be enabled on the drive that is holding your documents.
For more information about previous versions, please refer to the version history.
Tips how to get started with Notebooks for Mac and more introductory info is available in an extra article as well.
FAQ – Notebooks for Mac
There are No Search Results, Contexts, Recently Modified Items etc.
Notebooks uses macOS Spotlight search for performing full text searches, listing items assigned to Contexts or Favorites, finding Recently Modified items and more. So when a search in Notebooks does not return any results, or when smart books are empty when they should not be, reindexing macOS Spotlight may help.
As of early 2023, we have observed that the new Dropbox application for macOS 12 (its document migration, to be precise) may also cause Spotlight to fail. We have prepared a dedicated article about this.
In any case, you can reindex Spotlight for a specific volume with a few simple steps.
Open System Settings > Siri & Spotlight > Spotlight Privacy (on macOS 12 and earlier, open System Preferences > Spotlight > Privacy)
Add the volume containing your Notebooks documents (that is "Macintosh HD", for example, not just the user's Home directory) to the Privacy list.
Wait a few seconds.
Remove the volume from the Privacy list again.
Spotlight starts to index the volume, which may take a while. To determine if Spotlight is still indexing, use cmd-space to open Spotlight and type a few characters; now wait about a second and you should see a progress bar indicating the progress.
When Spotlight has finished indexing the documents, search and everything else in Notebooks is supposed to work as usual.
Dropbox' recent upgrade introduced a few fundamental changes regarding its storage location. Most importantly, Dropbox no longer stores its documents in Home/Dropbox - or which ever folder you chose -, but instead needs to use Home/Library/CloudStorage/Dropbox. For convenience, you reach this folder as Dropbox from the Finder sidebar's Locations section.
This change has some influence on Notebooks, too. Here are a few tips and hints.
You might want to Quit Notebooks before allowing Dropbox to move its documents.
If possible, try not to open and use Notebooks on this Mac while Dropbox moves its documents to the new location.
When you then reopen Notebooks, you need to select a new "Notebooks Home". This is because the previously selected location Dropbox/Notebooks no longer exists. To select the new Home, just click on Dropbox in the sidebar and choose Notebooks. (If you have been using a different folder than "Notebooks", select that instead).
Notebooks opens and displays your documents as usual, but it might not display the correct number of Due Tasks, Favorites and Contexts. Moreover, search may not yield any results. This is because macOS Spotlight, which Notebooks uses for all these tasks, needs to reindex the documents.
Trigger a Spotlight reindex of the volume which holds your Dropbox documents.
Open System Settings > Siri & Spotlight > Spotlight Privacy (on macOS 12 and earlier, open System Preferences > Spotlight > Privacy)
Add the whole volume containing your Dropbox documents (that is "Macintosh HD", for example, not just the user's Home directory) to the Privacy list.
Wait a few seconds.
Remove the volume from the Privacy list again.
Spotlight starts reindexing the volume, which may take a while. To determine if Spotlight is still indexing, use cmd-space to open Spotlight and type a few characters; now wait about a second and you should see a progress bar indicating the progress.
When done, open Notebooks, right-click the smart book Contexts and select Refresh Contexts to update their contents and correct the numbers displayed.
Now Notebooks can use the new Dropbox location as before.
You might see this message when you are using an app like CleanMyMac with the option to cleanUniversal Binaries. This process strips part of Notebooks' binary, so Notebooks has the impression that the app has been tampered with. - Yes, we pay attention to this 😉
To resolve this issue we recommend to
download and install Notebooks from our website again and
turn off the option to clean universal binaries in CleanMyMac.
Synchronize Documents Between Notebooks on your Mac and iPad or iPhone
If you don't want to use external services like Dropbox or WebDAV servers for synchronization, you can synchronize documents between Notebooks on your Mac and iPad or iPhone directly. Notebooks for Mac has a WebDAV server built in for that purpose. This way, your documents never leave your own network. - This is how to set up synchronization between Notebooks on your Mac and an iPad:
In Notebooks for Mac, open Preferences > Notebooks Server and start the server; a WebDAV server is now running on your Mac. When macOS asks you to allow incoming traffic for Notebooks, please agree. Now with the server running, Notebooks displays all the details necessary to connect from Notebooks on iOS.
In Notebooks on your iPad or iPhone, open Settings > Sync and activate WebDAV; then open the WebDAV settings and enter the details presented in Notebooks for Mac. You can leave the start directory empty, but you might consider activating Sync Moves and Deletes and Sync System Files.
When you now open a book’s action menu, you find an option Sync <name of your server> which allows you to trigger a sync of the current book and its contents with Notebooks on your Mac – provided Notebooks for Mac is running and your devices are connected to the same wireless network.
Synchronize Notebooks for Mac with iPad and iPhone via Dropbox
If you use Notebooks on an iPad or iPhone and synchronize its contents to Dropbox, it is easy to pick up and work on the same documents with Notebooks for Mac.
If you have not already done so, download and install the Dropbox client for Mac, a free download from the Dropbox website. This app automatically and continuously synchronizes the contents of your Dropbox (and with it the documents you sync from Notebooks on an iPad or iPhone) with a folder on your Mac.
Select the Dropbox folder you use for synchronization from your iPad or iPhone as home folder for Notebooks on your Mac. By default, this folder is Dropbox/Notebooks, located in your user home.
With this setup, Notebooks for Mac displays the books and documents from your Dropbox sync folder and saves all changes and modifications to that folder. The Dropbox client on your Mac then syncs these documents to Dropbox, from where they find their way into Notebooks on your iPad or iPhone.
One of the benefits of Dropbox compared to other services is its history of changes, reaching back at least 30 days. If something ever should go wrong, there is always an easy way to restore the original documents.
Should you purchase Notebooks from the Mac App Store or from us directly?
The versions of Notebooks available from the Mac App Store and from our website are mostly identical, but due to the Mac App Store requirements there are a few minor differences. Apps sold through the Mac App Store need to adhere to macOS Sandboxing. This mechanism ensures that applications only access documents and folders that the user has explicitly selected. This selection is made when choosing a Notebooks Home.
Symbolic Links
The Mac App Store version Notebooks is not allowed to follow and resolve symbolic links if the link's target is outside of Notebooks' home folder or resides on a different partition. Folders seem empty and Notebooks displays their titles in a lighter color.
If you rely on hard links in Notebooks, we would recommend to download and use the versions available directly from our website.
Webarchives created in Notebooks don't open in Safari
Another side effect of Sandboxing: certain files created by applications are quarantined by macOS. When you double click to open them in Finder, macOS displays a warning and refuses to open them. – In the case of Notebooks, webarchives may be affected (they are created when you copy some formatted text and then choose New from Pasteboard).
To open these webarchives from Finder, right click on them, choose Open with > Safari, choose Open and enter your password. This removes the quarantine flag from the file, and from now on you can open it as usual.
If you are not afraid of using Terminal, you can use the following command which does not require your password:
xattr -d com.apple.quarantine <path/to/the/file>
License
While you can install the Mac App Store version of Notebooks an all Macs linked to your Apple ID, you can activate the license purchased directly from us on up to five Macs. When that quota has been used up you need to deactivate Notebooks on one Mac to activate it on another one.
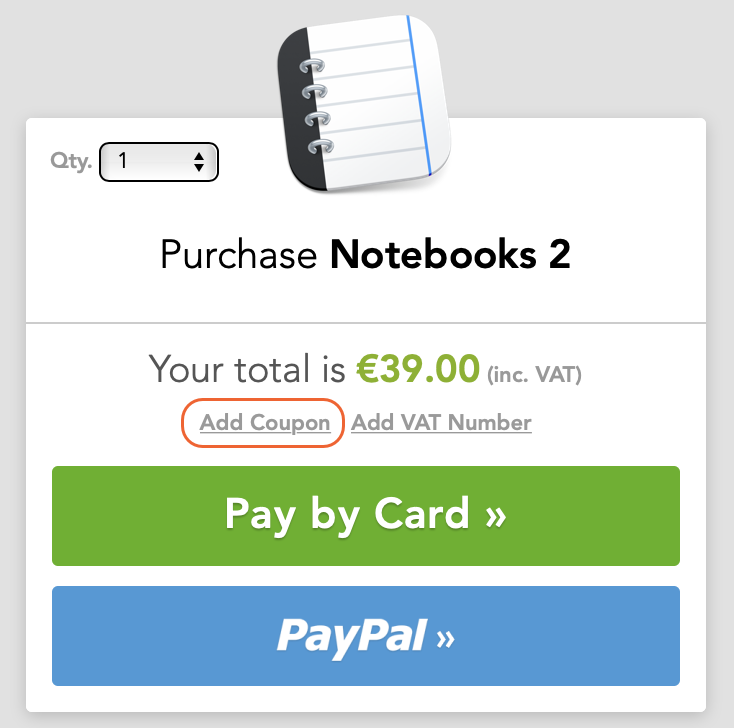
If you receive a coupon code for Notebooks for Mac 2.0, you can redeem it when purchasing a license directly from us. You can get a license either from within the trial version of Notebooks 2.0 or through our web form. The process is identical in both cases.
On the screen which asks you to select the payment method, click Add Coupon and enter the code. The total sum then reflects the applied discount.
In some cases, Notebooks for Mac may encounter an issue and get stuck during startup. This may happen because the selected home contains a huge number of new documents which need to be scanned, or the previously opened document causes problems and leads to a crash. - Here are a few tips how to resolve these situations:
Press the cmd key immediately after launching Notebooks. This keeps Notebooks from opening the previously viewed document.
Hold the alt or option key during launch, and Notebooks ignores the currently selected Notebooks Home. Instead it asks you to select a folder as Notebooks Home. With this you can fix situations in which Notebooks freezes or gets stuck during launch. Even reselecting the current Home is fine.
If that still does not help, you may consider resetting Notebooks' preferences. For that, close Notebooks, launch the Terminal application and enter the following command
defaults delete com.aschmid.notebooks2
After typing <return>, launch Notebooks, select your Notebooks Home folder and you should be set.
Notebooks for Mac provides a combined full text search and document filter in the header of the document list (the second column).
Filter the Current List
As you start entering text in that field, Notebooks filters the currently displayed list and displays only the documents containing the given word or phrase in their title. This is handy when you look for a specific document in a long list: enter a few characters that are contained in its title to quickly turn up that document.
The filter is available in regular books, but also in most of the smart books (even recent items and recently modified.) It operates on the list of currently displayed documents, so it does not look at the contents of nested books.
To clear the filter and return to the regular list, just clear the text field.
Full Text Search
If you type return after entering the text, Notebooks starts a full text search. The scope of the search is by default limited to the current book (and the hierarchy below), but a checkbox right next to the search field allows you to change the scope to all books (that checkbox shows up as soon as Notebooks displays search results.)
The search results appear as a list of documents, similar to the contents of a regular book. Notebooks does not display any preview for the search results, but displays the documents' paths instead.
To clear the list of search results just clear the search field.
If you have been using Evernote as your note management solution and want to move your notes into Notebooks, you can do so with a few simple steps:
Export your Evernote notes in .enex format.
Move the exported file into Notebooks. On a Mac you can do so by dragging it into a book in Notebooks' outline or document list. On an iPad or iPhone, you can import the file through any of Notebooks' sync options, via WiFi Sharing, you can add it from Finder or through iCloud Drive.
Then in Notebooks, select and open the file.
Notebooks displays some status info and an import button In the right window. Click that button to extract your notes contained in the .enex file and add them to Notebooks.
Wait until the process has finished and you are done. You can now continue to work on your documents directly in Notebooks.
Are there any recurring fees with Notebooks for Mac?
Once you purchase a license to unlock Notebooks for Mac, you can use it as long as you want, the license is "yours". There are no monthly or annual recurring fees.