Links and References
Within Notebooks‘ structure, each book and document has its unique position and is reachable by navigating along the hierarchy of books. Sometimes, however, it may be helpful to get from one document to another one with a single click or tap: when that other document provides more details on a topic, for example, or if it is related in some other way.
Cross reference or Wiki Link are two terms for this type of shortcut, and that is what Notebooks‘ internal links are about: when added to an editable document, these references act like regular links in a web browser, and clicking them opens the referenced book, document, or a specific section within a target document.
The simplest way of creating a cross reference is to grab a document from the list and drop it into another document. If that other document is plain text or Markdown, Notebooks inserts a link in Markdown format; if it is a formatted document, Notebooks inserts a regular link. In both cases, the dropped document’s title becomes the link’s text, and clicking the link opens the target document.
This is how you can quickly create a link between two documents, and in many cases this may be all you need. If you want to learn more about link formats and advanced usage, however, please read on.
Link Formats
Let us start by taking a look at format and structure of links supported by Notebooks‘.
Notebooks Links
Notebooks links start with the scheme1 notebooks:// followed by the path to the document.
notebooks://path/to/document.html
notebooks://path/to/document.html#chapter-2
Using these links in other apps tells the system to open Notebooks and pass on the link for further processing. Notebooks usually displays the referenced document, but there are special links or URLs which ask Notebooks to perform specific actions. Notebooks links are functional only when Notebooks is installed on the current system.
When pasting such links into a Notebooks document, Notebooks usually removes the scheme and uses the path to the document only. Formatted documents retain the scheme, though, and this makes sure that links remain valid in case the formatted document is used in other applications.
The Copy Link action, detailed below, puts a Notebooks Link onto the clipboard.
Markdown Links
When composing Markdown documents, you can add links in the format specified by the Markdown syntax: give the link’s text or label in brackets, followed by the actual URL in parentheses. On conversion to HTML, these elements are translated to regular links.
[This is the label](path/to/document)
[This is the label](../relative/to/document.md#chapter-3)
[This is the label](notebooks://path/to/document.txt)
[This is the label](#reference-in-same-document)
As you see from the examples above, the link (the part in parentheses) can be a Notebooks link, but it can also be a path to a document in Notebooks and even reference a section of a document. This path may start at Notebooks’ root, or it can be relative to the current document. More details on this follow in the section Link Structure below.
When adding a link’s URL, you can take advantage of Notebooks‘ autocomplete suggestion.
You can use Markdown links in plain text and Markdown, but not in formatted documents.
Wiki Links
By definition, Wiki Links are intended to connect to other pages on the same system (within Notebooks, in our context), so their syntax is simpler and usually consists of a single phrase in double brackets. The phrase is the link’s label and also its target.
[[Link Management in Notebooks]]
In the example above, the link’s text is Link Management in Notebooks, and the link points to the document Link Management in Notebooks.
This, of course, raises the question of where the target document needs to be stored so Notebooks can find it. By default, the target document is supposed to reside in the same book as the referencing document, but Notebooks offers a couple of smart options to automatically look for the target if it does not yet exist, and it also provides an option to create the target document when you click the link, a convenient feature if you use Notebooks as your personal Wiki. You find more details about Notebooks‘ smart link resolution in a dedicated chapter.
In Notebooks, Wiki links are not restricted to a single phrase; they can also contain the path to a document stored in a different book. In this case, Notebooks uses the path’s last element as text. Here is an example:
[[../Definition/Wiki Links.md]]
[[link/to/target]]
As another addition, Notebooks supports an explicit label or text in the Wiki link definition. The label is separated with a pipe (|) character.
[[../Definition/Wiki Links.md | About Wiki Links]]
[[link/to/target | a label]]
Like Markdown links, you can use the Wiki link notation in plain text and Markdown documents, but not in formatted documents.
To create Wiki links in formatted documents, just select a phrase in the formatted document and choose Wiki Link from the context menu (macOS) or from the ••• extra button (iPhone & iPad). This turns the selected phrase into a link, pointing to a document of the same title. Notebooks‘ smart link resolution options apply to these links as well.
File References
You probably won’t encounter file references in Notebooks very often, but we cover them here primarily for the sake of completeness.
file:///full/path/to/some/document.txt
File references use the scheme file:// followed by the the full path to the referenced documents. In contrast to Notebooks links, the path of a file reference starts at the system root (not Notebooks‘ root), which means that these links work a specific device only.
Clicking a file reference opens the corresponding file in Finder on a Mac. On iOS, these links often don’t work, unless the referenced file is accessible from the current app. Due to strict sandboxing restrictions on iOS, this is rarely the case.
Notebooks uses these links to include attachments when displaying formatted documents, converting between file references and internal links on the fly. When saving formatted documents, file references are replaced with relative paths for maximum compatibility.
As said, you won’t see these links very often, but if you do, you know what they mean.
Link Structure – Absolute vs Relative Links
A link describes the path to a document within Notebooks. The description can be the absolute path starting at Notebooks‘ root, but it can also be the relative path starting at the current document.
Notebooks Absolute Links
A “Notebooks absolute link” describes the path to a document, starting at Notebooks’ top level.2
As an example, /INBOX/Todo.md is a Notebooks absolute reference to the document Todo.md located in the book Inbox, at Notebooks’ top level. No matter where within Notebooks this link appears, it always refers to this document.
Notebooks‘ absolute links start with /
Relative Links
A relative link describes the path to a document relative to the current document. So it does not start at Notebooks’ top level, but at the current position.
An example: the link Todo.md refers to the document Todo.md in the same book as the document containing the link (let’s refer to it as the source document). When you move the source document to another book, the link still points to Todo.md, but as it is a relative ink, it now points to a document in that other book.
Relative links can point to targets in different books as well:
Images/Cover.pngrefer to Cover.png located in a sub book Images.../Todo.mdreferences the document Todo.md, one level above the current document, in its parent book.../Images/Cover.pnglooks for Cover.png in Images, but also in the parent book.
Relative links must not start with /
As relative links are interpreted relative to the source documents, they may point to different targets when used in different documents – or when moving the source document to a different book. This may be a desired effect, but it can also be unexpected, so please keep that in mind.
Filename Extensions
In the examples above you many have noticed that some links have filename extensions3 while other do not. For Notebooks links, extensions are optional, even if a link points to a document. This is because Notebooks can apply smart methods when opening a link’s target: when a target does not exist as given in the link, Notebooks can guess the filename extension, and it can even search for similar titles. You find more details about this in Smart Link Resolution.
In Notebooks, filename extensions in links are optional.
Get an Item’s Link from the Copy Link Action
Now that we have covered the basics, it is time to start working with links.
To reference an item – other than using the drag and drop method explained at the beginning – you first need to identify and retrieve its link4, which you can then use in another document. Notebooks provides various options to retrieve an item’s link, and advanced users may even compose links manually.
To retrieve an item’s link, you usually use Notebooks‘ Copy Link action, which adds the selected item’s link to the clipboard. From here you can paste it anywhere within Notebooks or any other application. Notebooks provides a Copy Link action in various places, so it is always close at hand.
On iPhone & iPad
- For the currently opened book or document
- Tap the action button (the square with the arrow pointing up) and select Copy Link.
- For an item in the list of books and documents
- Tap and hold an item until the context menu appears, then choose Copy Link, or
- Swipe left across the item’s title, tap the action button and choose Copy Link.
On Mac
- For the current document
- Tap the ••• button in the menu bar and select Copy Link, or
- Open the File menu and choose Copy Link.
- For the current book
- Tap the ••• button in the header of the second column and choose Copy Link.
- For an item in the list of books and documents
- Right-click an item and select Copy Link from the context menu.
Compose Links with Autocomplete Suggestions
Using the copy/paste method above is fine for a few links, but it may become bothersome if you constantly need to switch between source and target documents. To streamline the process and avoid distraction, you can take advantage of Notebooks‘ autocomplete suggestions while typing. The available options depend on the document type you are editing.
Autocomplete Links in Markdown and Plain Text
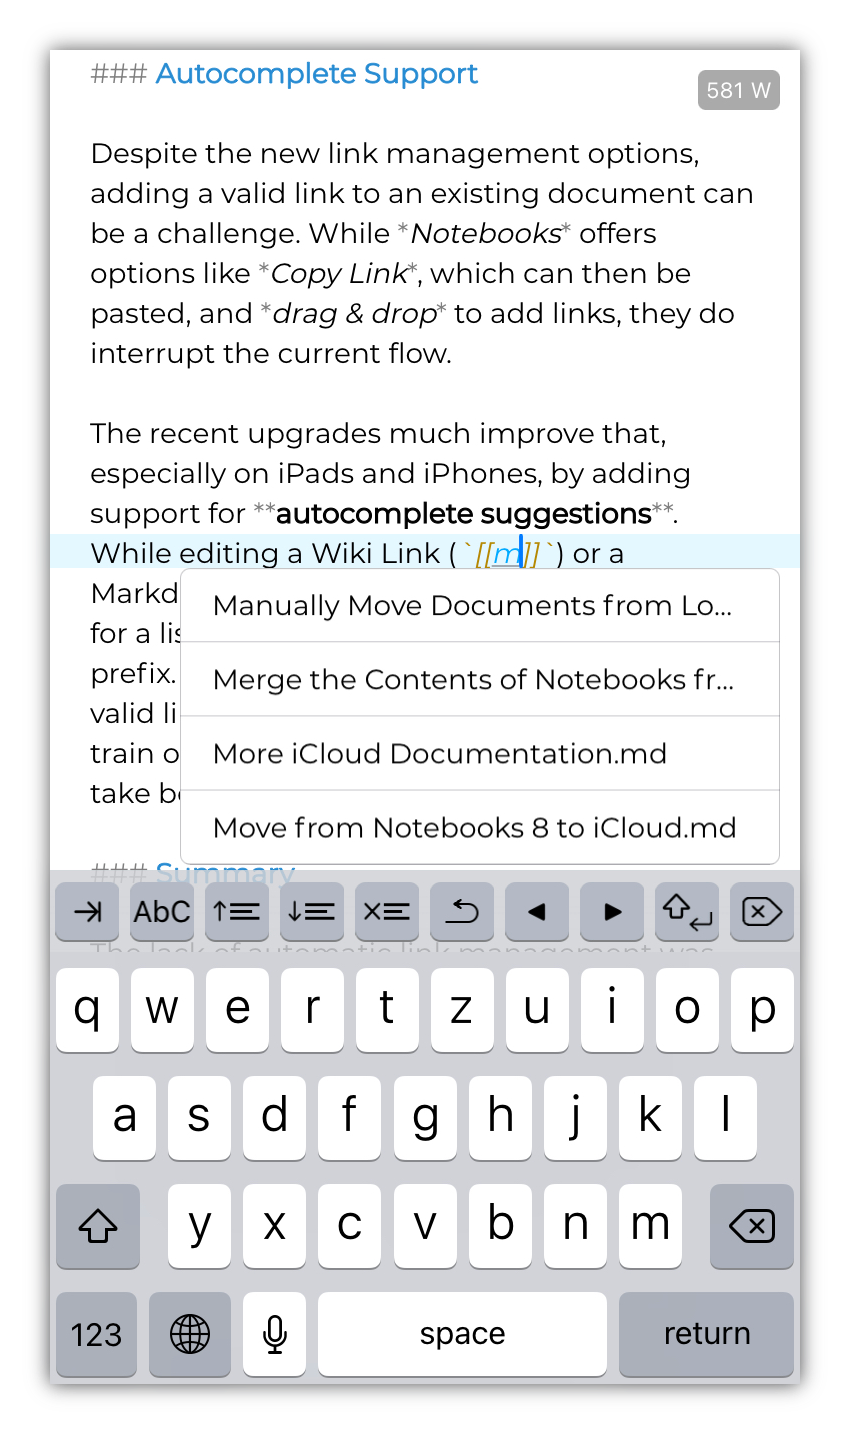
While editing a Markdown link []() or Wiki link [[]], with the cursor positioned between the parentheses (Markdown) or double brackets (Wiki), use the TAB key to pull up a list of suggestions, based on the current prefix. Notebooks takes the text between the opening parenthesis or bracket and the cursor, looks for document titles or paths which match this prefix, and presents the list of possible matches. Selecting any of these suggestions inserts the link to the document.
The screenshot shows an example where the user entered “m” between Wiki link brackets 5 and typed the Tab key; Notebooks displays a list of documents from the current book, starting with “M”; selecting an entry from the list inserts the corresponding link.
This is is one of the simplest cases of a relative link to a document in the same book, but links created with autocomplete suggestions can have any of the formats discussed above. They can be absolute links (starting with a /) or relative links, they can point to a document in a nested book, or into a different branch of Notebooks‘ hierarchy.
The list of suggestions does not automatically pop up when you place the cursor between parentheses or brackets. Notebooks does not want to get into your way and waits until you use the Tab key.
Autocomplete: Options and Syntax
Suggestions are not necessarily restricted to the scope of a book specified by the given prefix. They can show documents within the hierarchy of the specified book, including nested books, but Notebooks can also search across all documents if you wish. Here are a few rules and examples:
- Add a leading slash character to start search at Notebooks‘ top level.
Use a prefix like[[/Project]]to search for all books and documents containing “projects” in their titles. The list of results may include a book “Projects” at Notebooks‘ top level as well as a document “Incomplete Project Descriptions.txt” in some nested book. - Skip the leading slash to search the current book and its descendants.
With the previs[[Projects]]you limit suggestions to items with “projects” in their titles, stored in the current book or any of its nested books. - A trailing slash tells Notebooks to list the content of the specified book, but skip any nested books.
Use[[Projects/]]to get a list of all items contained in the book Projects, (which, due to the lack of a leading slash is expected in the current book), not including any nested book. – This allows you to sequentially construct the link to an item with a know path. - Skip the trailing slash to use the last component as search term.
This brings us back to the first example in this list, where[[/Project]]looks for all items with “project” in their titles. Other examples are[[/Inbox/2024-03]]to look for items in the Inbox with 2024-03 in their title, or[[2024-03]]to search for such items in the current book including its nested books.
Gathering suggestions across all documents may take a few moments, so the list of suggestions may pop up with a short delay.
Autocomplete: Search with Path Fragments
To avoid search across all documents, of if you want to steer into a specific direction without being too precise, you can provide a few path fragments as prefix. Notebooks tries to resolve the given fragments to a valid path, making sure that the leading components appear in order, even if components need to be added here and there, and the last component appears in the title of the suggested book or document.
So if you type [[/proj/mac/3.4]], for example, Notebooks might suggest the target [[/Projects/Notebooks for Mac/Version History/v3/3.4 Development Details.md]] – provided that path and document exist, of course. To look up an entry in your daily note book, for example, you could type [[/daily/-03-]], where “-03-” might mean “March“.
Autocomplete: Link to Document Sections
With autocomplete suggestions you can create links to headings and anchors in documents as well. To tell Notebooks that you are looking for headings, add a fragment (i.e. the very last part of the link) starting with #, as in [[Definition.md#]]. Use a notation like [[#chap]] to search for headings starting with “chap” in the current document. – More details about how to create anchors follow in a separate section.
Notebooks requires a valid path in order to look for headings, so the search options described above do not apply here.
Autocomplete in Formatted Documents
The Wiki and Markdown link syntax is supported in plain text only, so the methods above are unavailable for formatted documents. Notebooks offers a different approach here:
On iPhone & iPad
You still need to use Copy Link and paste the link into the document. – Ideally, you use the Insert Link option from the ••• button’s options instead of a simple paste; Insert Link handles links in a slightly smarter way and tries to derive a useful text for the link. When using insert link with text selected, Notebooks assigns the link to the selection.
On Mac
- Use Insert Link from the context menu, type
cmd-K, or chooseURLfrom the document header’s ••• menu. - In the dialog window that appears, you can use the Tab key to autocomplete a prefix. However, as the advanced options and syntax described above are not available, Notebooks can only try to complete the given prefix, but does not do any search or guessing.
Link to Document Sections
Sometimes it may be necessary to link to a specific location in a target document, not just to the document itself. You can achieve this by adding a so called fragment to the link. The following example is a Notebooks link, pointing to the section named relative-links in the document Links.html.
notebooks://Projects/Writing/Links.html#relative-links
The fragment refers to a an anchor in the target document which is identified by the name or id equal to the fragment. This may sound complicated, but it is just the definition.
So when Notebooks opens the link from the example above, it looks for a section named relative-links. Please note that this name does not necessarily correspond to the visible text or heading in the document.
Anchors in Formatted Documents
To create an anchor to a specific section of a formatted document, follow these steps:
- Open the formatted document and scroll until the target selection is visible.
- Select part or all of the text that should become the target of the link.
- From the context menu (right-click macOS) or edit menu (pops up iOS), select Copy Link.
Notebooks inserts an anchor at the selected location and puts a link to that anchor on the clipboard; now you can paste it into another document.
Anchors in Markdown Documents
The simplest option to copy the link to a specific section of a Markdown document involves a quick detour to the document’s table of contents. While viewing the formatted version of a Markdown document, follow these steps:
- Make sure that the document displays its table of contents (TOC). If it does not, select ••• > Insert Table of Contents from the document’s action menu. You now find the TOC close to the top of the document.
Alternatively, add{{TOC}}where you want the TOC to appear. - In the TOC, tap and hold (or right-click on a Mac) the link to the section you want to reference; from the popup that shows up, select Copy Link.
An Advanced Option
More advanced users can derive anchors from a heading’s text and manually append it to a link. Here is how it works.
When converting Markdown to HTML, Notebooks automatically inserts an anchor for each heading. The exact format of the anchor depends a bit on the selected Markdown converter, especially with regards to special characters. In general, the anchor corresponds to the heading, with spaces and special characters replaced by a minus - sign. If you keep this in mind, it is relatively easy to determine a heading’s anchor.
For example, the anchor to this section is #Anchors-in-Markdown-Documents.
Anchors can become quite long so Notebooks allows you define anchors for headings yourself. If we stick with the example above, you could specify a shorter anchor for this section like this:
### Anchors in Markdown Documents [md-anchors]
The trailing [md-anchors] becomes the anchor for this heading, and you can reference the chapter as #md-anchors. This notation has been introduced by MultiMarkdown, but Notebooks supports it in its default Markdown converter, too.
External Links
So far we have been looking at Notebooks internal link, but of course you can use any other links in Notebooks‘ documents’ as well. No matter whether regular internet links (https://) or links to other applications (mail:), you can use them all in Notebooks‘ formatted documents and in Markdown. Notebooks acts like a web browser, so it tries to open the links in its main window (unless you changed that in Notebooks‘ settings), or it asks the system to handle the link and open the corresponding application.
On iPhone & iPad
iOS and iPadOS are very restrictive about links to other applications and require that apps (Notebooks, in our case) declare which links to other applications they support. So it may happen that you add a link to a mind mapping application on the save device, for example, but Notebooks does not make the link tappable because of the lacking declaration. – If that happens to you, please drop us a line, mention which app you want to be supported in Notebooks and we will take care of it.
- A link’s scheme is followed by :// and defines which application or system can handle it. https: links are regular web links, mailto: is handled by an email reader, and notebooks: is handled by Notebooks. ↩︎
- By definition, absolute links start with a URL scheme, followed by a full qualified path. Our term Notebooks absolute links deviates from this and indicates links with absolute paths within Notebooks. ↩︎
- Filename extensions like
.txt,.htmldeclare a file’s type, so the system knows which application to open, and applications immediately know how to handle the document. Folders do not have filename extensions. ↩︎ - You can refer to Notebooks‘ links as URL, address, or which ever term you prefer. ↩︎
- With Notebooks’ option Automatically insert closing characters active, typing an opening bracket automatically adds the closing bracket, leaving the cursor in between. Type a second opening bracket for the Wiki link syntax. Typing another opening bracket removes all brackets again. ↩︎