Find and Replace
As your collection of documents, files and records grows, efficient ways to find information become increasingly important. If you don’t remember where to look for a deeply nested document created long ago, Notebooks‘ Search option will certainly help.
Notebooks offers different types of search:
- Finding books or documents containng a specific phrase brings up a list of matching books and documents. When you open a document from this list, Notebooks automatically highlights the search term in the the document.
- Searching the contents of the current document helps you locate a given term within the contents of the current document. Notebooks highlights all instances of the search hits and provides buttons to navigate between them.
- Notebooks for Mac provides an option to filter the current list of documents by a specific term. This is convenient when you know that the list contains a specific document, but you don’t want to scroll and look for it. So you type a few characters, and Notebooks shows the documents containing these characters in their title, skipping all others.
- All versions of Notebooks allow you to replace text in editable documents,
- and there is even a URL scheme to save search queries.
Find and Replace in Notebooks for iPhone and iPad
Find Books and Documents
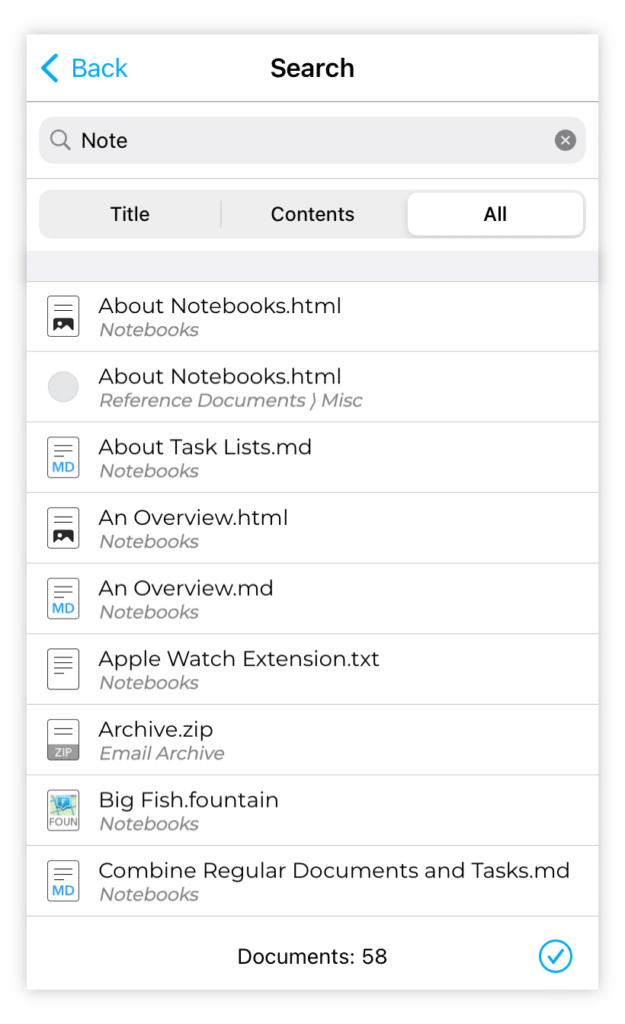
The search field is located at the top of the list of books and documents in every book. By default, Notebooks hides this field, so you may need to pull the list down a bit. You can change this default behavior in Notebooks‘ settings.
- Tap the search field to activate the keyboard, type a search term and tap the Search button.
- Notebooks starts searching for results and constantly updates the list as it finds new items. The list shows the items’ titles and the path to the enclosing book.
- Notebooks will search within the currently selected book and its contents. This is useful when you want to focus search on a specific book. If you want to search all books and documents, start a search from Notebooks‘ top level.
- You can set the search scope to titles only, contents only (full text), or both. Search by titles delivers the fastest results.
- The search process is usually fairly quick, but speed may vary depending on number of documents and selected scope. You can stop the search process anytime by tapping the Cancel button.
- You can open documents from the list of search results like in a regular book. As you do so, Notebooks highlights the search term in the document, scrolls to the first occurrence and displays tool as described in Find in Current Document below.
- From the list of search results you can switch to edit mode, which allows you to select multiple documents and create eBooks or PDF documents, assign context tags and more.
- To search for an exact phrase, put it in quotes. So when you use
"note taking", Notebooks lists only documents containing the exact phrasenote taking. - When searching the contents of documents, Notebooks looks at the full text of plain text, formatted documents (HTML), PDF, RTF, iWork and MS Office documents, web archives and most other document formats which Notebooks can display. It also includes Description, Context Tags and recognized text1.
Notebooks uses its own full text search index, which is a plain text version of the document’s contents. Notebooksusually creates and updates this index when you view or edit documents, but if you have never opened a document before, Notebooks needs to create its index when it examines the document during search. So when search takes a longer than usual, it may be because Notebooks creates the index for a couple of new documents.2 - If you enter multiple words, Notebooks searches for items containing all words, but the order in which they appear is not relevant. This is like an and combination of terms.
When you typenote taking, for example, Notebooks lists all documents containingnoteandtaking.
Find in Current Document
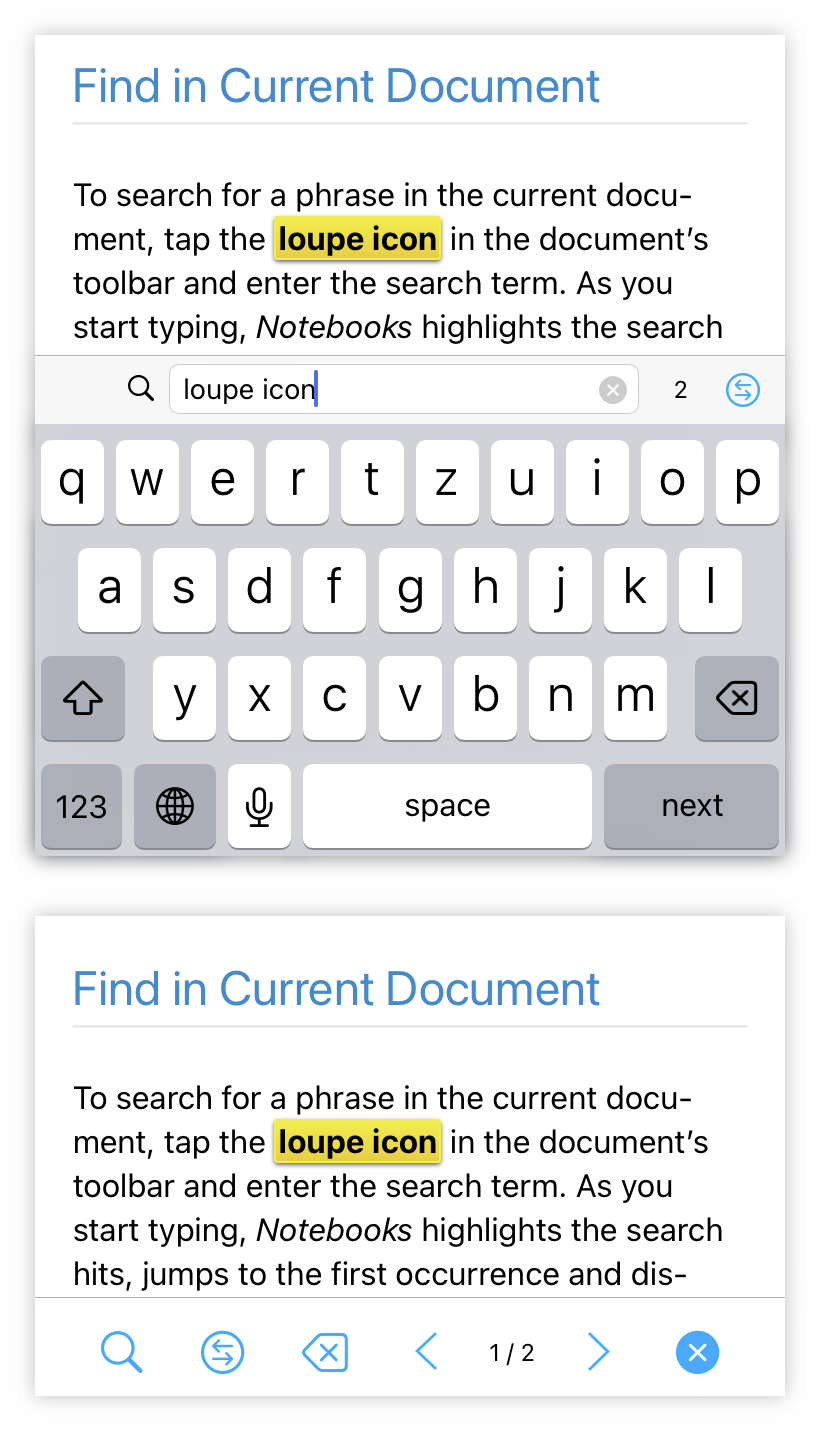
To search for a phrase in the document you are currently viewing, tap the loupe icon in the document’s toolbar and enter the search term. As you start typing, Notebooks highlights the search hits, jumps to the first occurrence and displays the number of hits. With at least one search hit, Notebooks displays an additional button next to the search field which would take you straight to the replace text interface.
If you tap the next or search button on the keyboard (or type the return key on an external keyboard), the search field hides, and Notebooks displays a series of buttons in the toolbar. You find the same buttons when opening a document from the list of search results, as mentioned above.
- A loupe icon to bring back the keyboard so you can edit the search term.
- A button to switch to replace text mode, provided the current document is editable (PDF documents do not support text replacement).
- A dedicated button to delete text, which is a special case of replacing text.
- Navigation buttons to move back and forth between search hits.
- The close button removes the search interface, returns to normal mode.
When searching the current document, Notebooks takes the search term as is and highlights exact matches. So when you enter note taking, Notebooks will highlight only this exact phrase.
As you close the search interface, the document’s scroll offset remains at the position of the focussed search hit. This is convenient if you use a character sequence to mark a text position, for example, and want to return to this position at some later time.
Replace Text
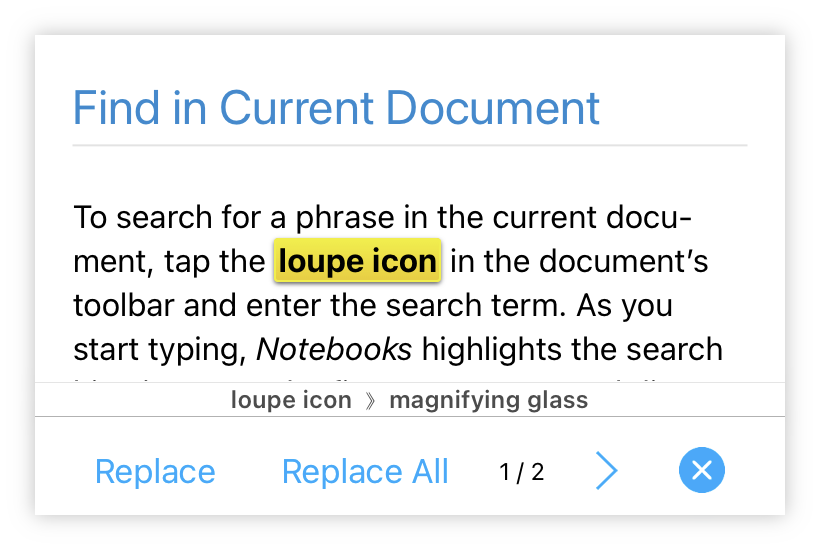
When you switch from search to replace mode, the keyboard appears again and prompts you to enter the replacement text. Type in the text, tap next on the keyboard and Notebooks displays a new set of buttons in the toolbar:
- Replace changes the currently highlighted search hit and advances to the next.
- Replace All changes all search hits without further confirmation.
- The > (Next) button advances to the next search hit without changing the current one.
- The Close button brings you back to the search interface, from where you can continue to search or return to normal mode.
Delete Text
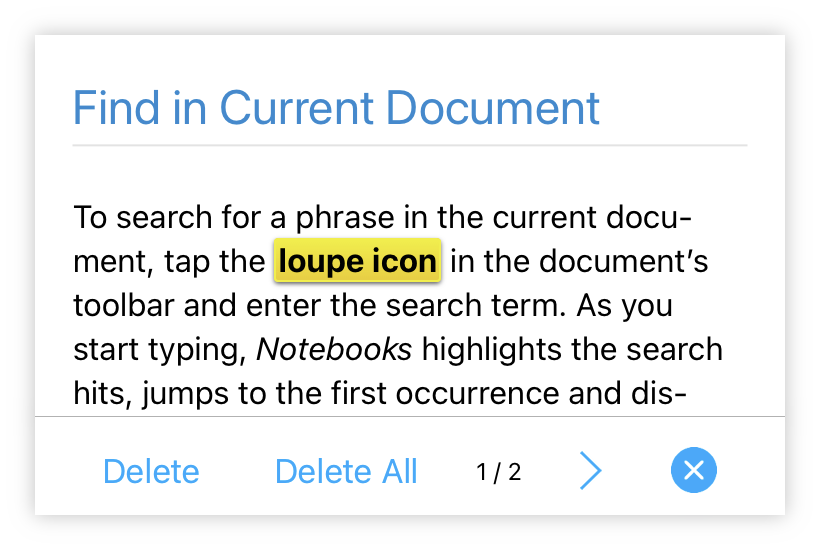
Deleting text is a special case of replacing text and allows you to quickly remove some or all of the highlighted search hits. When you tap the delete text button, Notebooks shows the following set of buttons in the toolbar:
- Delete removes the text of the currently highlighted search hit and moves to the next.
- Delete All removes the text of all search hits.
- The > (Next) button jumps to the next search hit without deleting the current one.
- The Close button brings you back to the search interface.
Filter, Find and Replace in Notebooks for Mac
Filter and Find Books and Documents
To search for books and documents, use the search field in the header of the document list. You can show and hide the search field by clicking the loupe icon or using the keyboard shortcut ⌥⌘F (Filter and Find). Notebooks remembers the state of the search field, so you can keep it visible at all times, if you want.
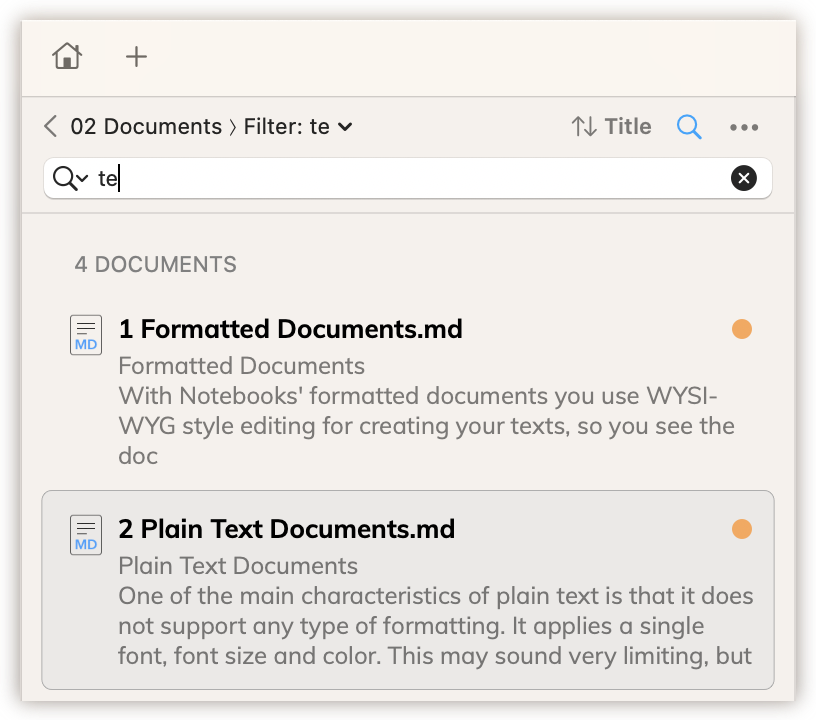
Filter the Current List of Documents
As you start typing in the search field, Notebooks filters the current list of documents and shows only the items containing the given text in their title. This can be very convenient when you know that the list in front of you contains a specific document, but you don’t want to scroll and look for it. So instead, you type a few characters, and Notebooksdisplays only the documents which contain the given text in their title.
- The filter is available in regular books, but also in most of the smart books, even recent items and recently modified.
- It operates on the list of currently displayed documents, so it does not look at the contents of nested books.
- To clear the filter and return to the regular list, just clear the text field.
Find Documents in the Current Book or all Books
When you type return, Notebooks leaves the filter mode and starts to search, using the text given in the search field. The results appear in the list below, where Notebooks displays the documents’ titles and – for better orientation – the book where each documents resides. Selecting a document from the list opens it as usual, but for editable documents, Notebooks activates the find in document mode, highlights the search hits and displays a toolbar with options to navigate between search hits or switch to Replace mode.
- If you enter multiple words, Notebooks searches for items containing all words, but the order in which they appear is not relevant. This is like an AND combination of terms.
When you typenote taking, for example, Notebooks lists all documents containingnoteandtaking. - To search for an exact phrase, put it in quotes. So when you use
"note taking", Notebooks lists only documents containing the exact phrasenote taking.
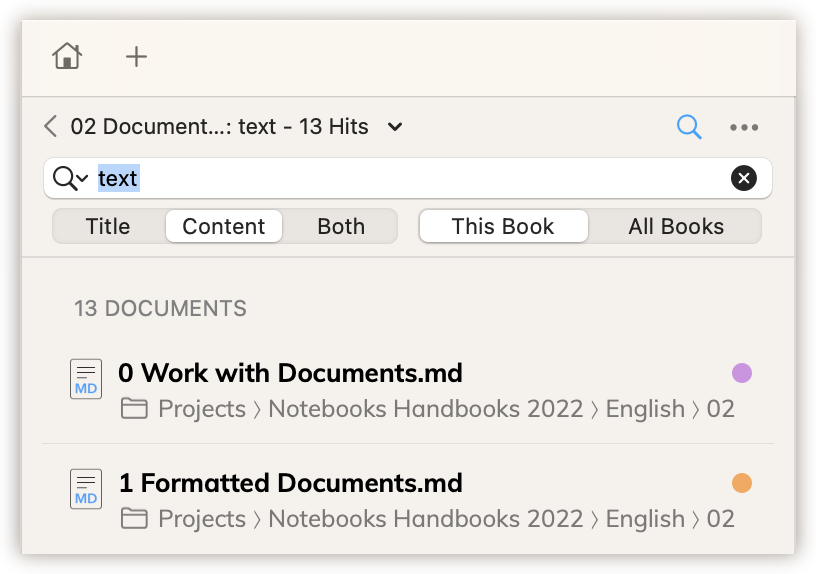
Directly below the search field Notebooks displays an extra row with options to further specify the search scope:
- By default, search is limited to the current book and its contents, which allows you to focus in on a specific section of your documents. The search options provide a button to tell Notebooks to search all books, no matter where you started your search from.
- You can further specify whether you want to search titles only, contents of documents only or both.
- Notebooks remembers you selection and applies it the next time you start a search.
Notebooks for Mac uses macOS Spotlight for search, so it is necessary that Spotlight is enabled for the volume (drive) which holds Notebooks‘ documents. There may be situations when full text search does not return any results, although you know there should be. This may happen when the macOS Spotlight search index is out of date, and you can easily fix this with a few steps, as detailed in a dedicated FAQ article.
Find in Current Document
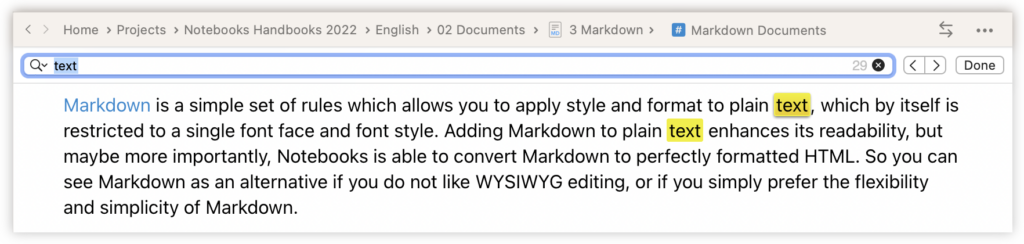
When you open a document from the list of search results, or if you type ⌘F (Find) in a document, Notebooks displays the macOS default search dialog at the window’s top edge. Enter the text phrase which you are looking for (it is already filled in if you open the document from search results), and Notebooks highlights the search hit and jumps to the first occurrence. 
The user interface also provides buttons to jump to the next or previous search hit, close the dialog or – in the case of editable documents – to switch to replace text mode. – This is all macOS standard functionality, so we do not go into more detail here.
Search in Document is available for all editable document formats, PDF, email and webarchives (with open in QuickLook disabled).
Search using Notebooks’ URL Scheme
One of Notebooks‘ URL Schemes triggers a search for a given search term, optionally starting at a specific book. The scheme is specified like this:
notebooks://search/term%20to&20search%for&scope=book/to/search
notebooks://search/term%20to&20search%for
With this scheme you can add search queries to documents just like links. These links, when tapped or clicked, perform a search and present an up to date list of results. This allows you to create an index document of search queries, for example, but you can add such links to any regular document.
A useful example is a search for open Markdown tasks. As you may know, tasks in Markdown can be defined by starting a line with - [ ], which defines an open task. So when we look for Markdown documents with open tasks, we just need to look for this characters sequence, but we need to correctly percent escape spaces. So the corresponding URL scheme would look like this:
notebooks://search/-%20[%20]
Added as a regular link to a Markdown document, it might look like this: [Open Tasks in my Daily Notes](notebooks://search/-%20[%20]&scope=Daily%20Notes)
A later version of Notebooks will allow you to save search queries, which then appear in dedicated smart book.
- When recognizing text in a PDF document or image, Notebooks stores the extracted text as property in the document’s system file, which makes it available for full text search. ↩︎
- There may be cases when Notebooks crashes while creating a document’s index on the fly. If that happens, just reopen Notebooks, and it will usually display the document in question, which also updates its full text index. This document won’t cause a crash again. ↩︎