Synchronize Documents with iCloud Drive
To set up synchronization with iCloud, select iCloud Drive as storage location for Notebooks, following these steps:
- Make sure you are logged in to your iCloud account. You can verify the status in System Settings > Apple ID.
- Notebooks requires permission to use iCloud. This should be the default, but you can check this setting in System Settings > Apple ID > iCloud > Apps Using iCloud.
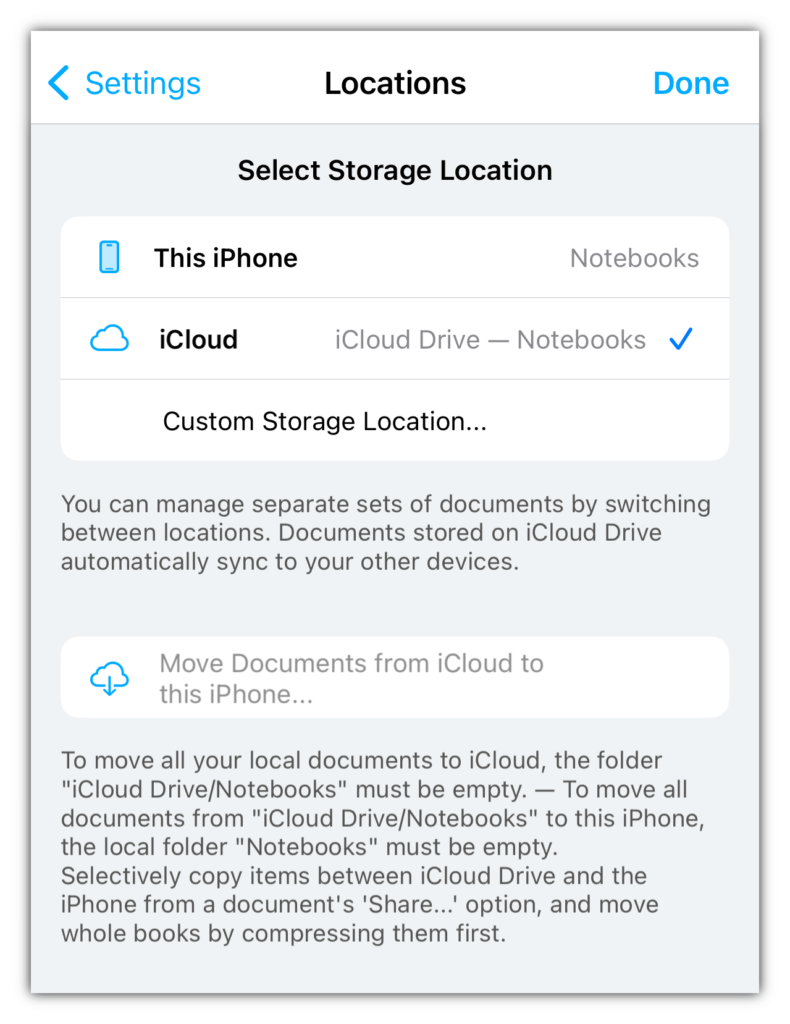
- Choose iCloud Drive as Notebooks’ storage location. You can do that when you launch Notebooks for the first time, but also anytime later in Notebooks Settings > Locations.
This is essentially all you need to start synchronizing your documents with iCloud, but of course there is more to learn. So for more in depth information, details and tips, please read on.
Basics
- Even when you use iCloud Drive as storage location, Notebooks‘ documents are stored locally, on the device. They reside in a container which iOS and macOS automatically synchronize with your iCloud account. This ensures that you can use and work on your documents even when the device is not connected to the internet. So iCloud Drive is really just another folder on your iPad, iPhone or Mac.
- On your iPhone or iPad, iOS may to stop syncing the content of your iCloud Drive when the device is connected to an unstable or weak network. So the stronger the internet connection, the more instantaneous the sync.
- Notebooks for iPhone and iPad is greedy in the sense that it downloads all your documents from iCloud and makes sure they are available offline. This is in contrast to the Files.app, for example, which downloads documents on demand.
- When using Notebooks for iPhone or iPad with iCloud Drive, other sync options like Dropbox or WebDAV are not available. – However, if you keep a separate set of documents in Notebooks’ local storage location, you can sync those with Dropbox or WebDAV.
- Throughout this document, we use the term iCloud as synonym for iCloud Drive; both refer to the same.
Selecting iCloud as Storage Location on macOS
Selecting iCloud as storage location in Notebooks for Mac is easy:
- When you launch Notebooks for the first time, you can decide where to store your documents. If you choose iCloud from the provided options, Notebooks will use its registered iCloud folder for your documents (this folder appears as
iCloud Drive/Notebooksin the Finder sidebar). All your additions and modifications will automatically sync to your other devices via iCloud. - You can always switch between storage locations 1 from Notebooks > Settings > General or from File > Storage Location. So if you are using a different location at the moment, switch to iCloud Drive when you want to work on the documents stored on and synchronized with iCloud.
The physical storage location of Notebooks‘ default iCloud folder is ~/Library/Mobile Documents/iCloud~com~aschmid~notebooks/Documents/, but as this is a reserved, registered folder, macOS Finder and the iOS Files.app show it as Notebooks at the top level of iCloud Drive.
Besides selecting the default iCloud folder, you can also select any other iCloud Drive folder as storage location for Notebooks/Mac. For details on how to sync such folders with Notebooks on iOS devices, please refer to the section about Custom Storage Locations.
Selecting iCloud as Storage Location on iOS
Generally speaking, you turn on iCloud sync by selecting iCloud as storage location in Notebooks‘ Settings > Location, but Notebooks may provide shortcuts and support depending on your current setup.
Setup without existing Documents
When you first launch a fresh installation of Notebooks with no existing documents, Notebooks asks you to select a storage location. You can either keep your documents in Notebooks‘ local storage, or allow Notebooks to store your documents on iCloud (in the folder iCloud Drive/Notebooks). When you choose iCloud, you also choose that your documents synchronize to other devices connected to your iCloud account.
Setup with existing Documents
When upgrading from Notebooks 10 or earlier, which did not yet support iCloud sync, Notebooks provides the option to move your documents from Notebooks’ local storage to iCloud Drive. Moving the documents to iCloud takes just a few moments, after which you can continue to use Notebooks as usual.
Immediately after moving, iOS starts to upload your documents to iCloud, from where they propagate to your other devices. The upload can take a while, depending on the the number and size of your documents and the quality of the internet connection. Notebooks continuously informs you about the sync status and how many documents still need to be synced.
Of course you do not need to make this decision right away, you can decide to move your documents at a later stage as well. For details, please read on.
Please note: If you use Notebooks on multiple devices, move your documents from the local storage to iCloud on one device only, otherwise you may create unnecessary conflicts and duplicates. – On your other devices, go to Notebooks’ Settings > Locations, choose iCloud, and Notebooks will start downloading your documents. You might want to wait until the first device has finished the upload, though.
Selecting iCloud disables all other sync options like Dropbox or WebDAV. If you keep your documents locally, you can use Dropbox or a WebDAV server to synchronize your documents.
Moving Documents at a Later Stage
If you are not quite ready for iCloud when prompted by Notebooks, you can decide to move your documents anytime later from Notebooks’ Settings > Locations. Here you can either switch between documents on iCloud and Notebooks’ local storage, but you can also move your local documents to iCloud or move the iCloud documents to the local storage. You find more details about moving document between storage locations in a dedicated chapter.
You can move documents between the local storage and iCloud only if the target folder is empty. Otherwise the option is not selectable.
Sync Status on an iPhone or iPad
On iPhones and iPads, Notebooks displays a colored status icon at the top of the list of books and documents to indicate the current state.
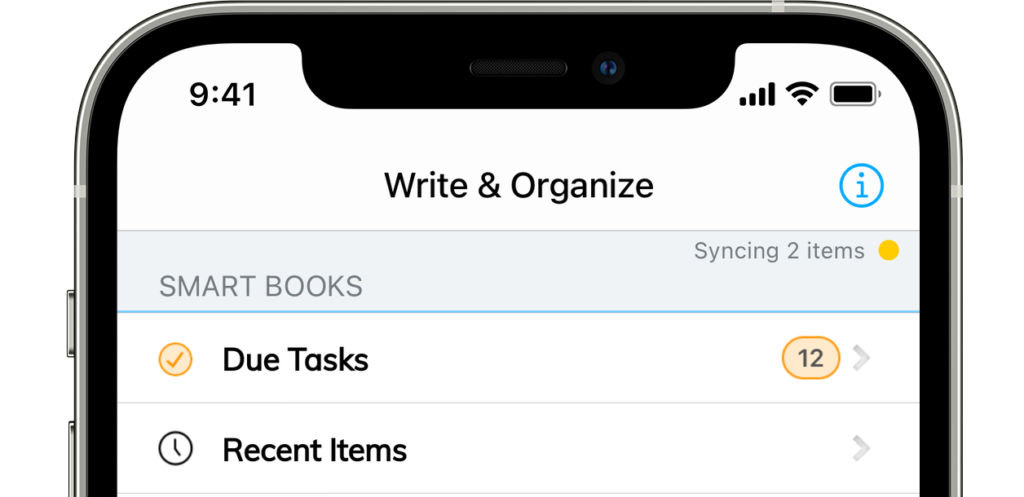
The status icon has four modes:
| Red | iCloud is not available, the user is not logged in. |
| Orange | iCloud is enabled, the user logged in, but iCloud is not reachable or sync has stalled. The device may not be connected to the internet, or mobile data are disabled for iCloud Drive. |
| Yellow | Sync is currently in progress. Notebooks displays the number of documents that need to be synced. When no number appears, there is just a single document to sync. |
| Green | Documents in sync |
The state orange needs to be taken with a grain of salt. If the number of documents being synced does not change for about 15 seconds, Notebooks assumes that sync has stalled or iCloud is not reachable, so it switches the status to orange. You find more details below.
In addition to the sync status icon, Notebooks marks the document which need to be up- or downloaded. In the list of documents, these items show a cloud icon with an arrow pointing up or down.
Observe the Sync Status in the Files.app
As Notebooks stores your documents on iCloud Drive, you can view and access them from the iOS Files app as well. Open the Files app, navigate to iCloud Drive > Notebooks and you see all your books and documents as regular files and folders. You can see the sync status of each item, and you can trigger the download of single files or whole books from the context menu (tap and hold an item until a menu pops up).
Sync Status on a Mac
Notebooks for Mac does not display a status icon, but when synchronizing more than just a few files, it displays the number of items in the header of the document list (the second column). This provides a fair indication of the overall sync progress.
In the document list, items that need to be up- or downloaded show a cloud icon with an arrow pointing up or down. This makes it easy to identify documents not yet synced.
Observe the Sync Status in macOS Finder
Notebooks‘ documents reside as regular files and folders on you Mac’s file system, so you can always access them from Finder as well. Just select iCloud Drive > Notebooks and you see all your books and documents, along with each item’s sync status.
Resolving Sync Conflicts
When working on a set of documents from different devices, it is just a matter of time until minor conflicts arise. However, Notebooks tries to make it as easy as possible for you to resolve them.
- Notebooks indicates the current sync state of each individual document.
- No icon means that the document is in sync.
- Dedicated up- or download icons indicate unsynchronized documents.
- A special conflict icon marks conflicting copies.
- When Notebooks detects conflicting documents, it adds a smart book iCloud Conflicts at its top level. This book lists all documents with conflicts, which is a convenient way of getting notified of conflicts and resolving them right away.
- To resolve a conflict, open the document and follow the suggestions presented in the alert dialog. You can choose which versions to keep, but you can also continue using the document in read only mode and resolve the conflict later.
If you open a conflicting document in another application which is aware of conflicting copies (TextEdit, BBEdit and many others), you will see a similar dialog asking you to resolve the conflict. However, applications which are not aware of conflicts will simply overwrite the conflicting copy with their own version.
When iCloud Sync Seems Stuck
When syncing thousands of documents, the sync progress sometimes may slow down, stall or get stuck. This is a known issue with iCloud, unfortunately, and it is not specific to Notebooks. Sometimes the situation resolves after a few moments, but if it does not change for more than a couple of minutes, you can try the steps below, from simple to more “aggressive”:
On iPhone & iPad
It is not always necessary to perform all steps listed below. We recommend to start at the top and move down the list until iCloud sync starts to work again.
- If the indicator is red, please make sure that you are logged in to iCloud and that Notebooks is allowed to access your iCloud Drive.
- Use the “pull to sync” gesture in the list of documents to trigger a sync. Notebooks requests the list of changes from iCloud, which may take 10 seconds or more, and then updates the sync status indicator. It should appear in yellow, with the number of documents to sync.
- If the indicator remains orange, turn on Airplane mode, leave it for a few seconds and then turn it off again.
- Restart the device.
- Use the Files app to enforce the download.
- Open the Files app and navigate the iCloud Drive.
- Tap and hold the folder Notebooks until the popup menu appears.
- From the menu, choose Download Now. – This tells iOS and iCloud to start downloading all documents which are not yet available locally. The download may take a while, and you might want to leave Notebooksclosed in that time. When sync has finished, open Notebooks, and all your documents should be up to date.
- You don’t necessarily need to trigger the download for the whole Notebooks folder. Instead, you can choose a nested folder and download that.
- Occasionally (particularly during system updates), iOS may delete the local copies of Notebooks‘ documents and subsequently download them again. To mitigate this risk, you may consider enabling the Keep Downloaded option from the menu.
- If Notebooks still tries to download all documents on launch:
- Please take a look at iOS Settings and check the available storage space on the device. If there is not enough space to store all of Notebooks‘ documents, iCloud will try to download them every time you open Notebooks, so you are stuck in a loop. Freeing up enough space will resolve that.
- Use the Files app to remove local copies before enforcing the download.
- As above, open the Files app and navigate the iCloud Drive.
- Tap and hold the folder Notebooks until the popup menu appears.
- From the menu, choose Remove Download. iOS deletes the local copy of your Notebooks files and immediately starts downloading them again.
As iOS removes the local copy of your documents, you should not do this if you know that you modified documents on the device and the changes have not yet been uploaded, otherwise these changes will be removed or replaced. - Again, you can also choose a nested folder and remove its local content instead of removing the whole Notebooks folder.
On Mac
- In the Finder sidebar, hover the mouse pointer over iCloud Drive; a status symbol should appear, indicating the sync status. Here you see if iCloud is currently syncing, has paused, or is in sync. You can click the status icon for more details.
- Disconnect your Mac from your network and reconnect.
- Sometimes, macOS may fail to download new folders and documents immediately, so they just don’t appear on the Mac. In this case create a new folder anywhere within the iCloud Drive hierarchy. This usually triggers the download of new items, too.
- On macOS, a process called bird is responsible for synchronizing documents with iCloud, so restarting this process can unblock sync. Here are two ways to terminate and restart bird:
- Open the
Terminalapp (Applications > Utilities), enterkillall birdand type<return>. You may even enter that command twice, but then you should see how iCloud finishes any pending sync. - Alternatively, open
Activity Monitorfrom Applications/Utilities, look for the process bird and quit it.
- Open the
- As a last resort, try to restart your Mac.
- Notebooks‘ Storage Location is sometimes referred to as Notebooks Home ↩︎