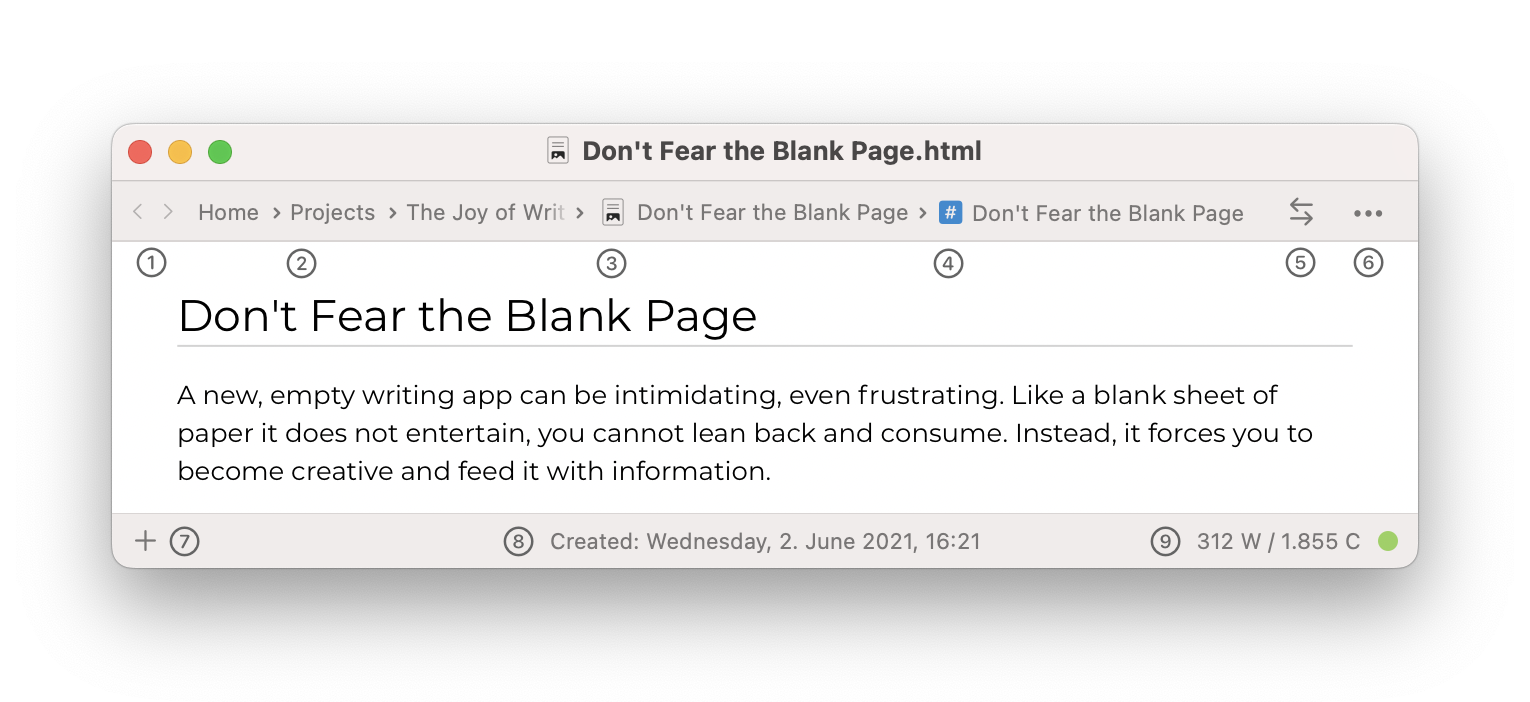
The Document View on a Mac
Notebooks for Mac displays a row of buttons and elements along the top and bottom edges of a document. We call them header and footer. By default, header and footer are permanently visible, even if you open a document in its own window, but you can set Notebooks to hide them until you hover the mouse over the top of bottom edge of the window (Menu > View). This provides a more distraction free writing experience for documents in separate windows or with the left columns hidden.
In Notebooks for Mac you can open multiple documents in separate windows, and you can even open the same document in multiple windows.
Header Buttons and Elements
The header described here should not be confused with the toolbar, which appears in the same spot when editing a formatted document.
- ① History Back / Forward
- These buttons allow you to navigate through the window’s history list. Each window has its own list.
- Click the left arrow to navigate back to the previously selected document; click and hold the left arrow for a list of previous documents and select the one you want to return to.
- When you navigate back, the right arrow becomes active and allows you to navigate forward in the list. Again, you can click or click and hold.
- The forward list automatically clears when you open a document other than selecting it from this list.
- ② Breadcrumb Navigation
- The Breadcrumb Navigation along the top of the document window displays the current document’s path, listing all parent books up the top level, which is indicated as Home.
- Click any breadcrumb to reveal a list of items in the same book.
- Select a document from the popup list top open it.
- Hover the mouse over a book in the popup list to reveal its contents.
- With these options, the breadcrumb navigation allows you to quickly open any document anywhere in Notebooks, even if the current document uses its own window without outline and document list.
- ③ Current Document
- The title of the current document. Click it for a list of all items (books and documents) in the same book.
- ④ Current Section/Chapter
- Formatted documents and Markdown documents show the currently focussed chapter or section as last element of the Breadcrumb navigation. Click it to reveal a dynamic table of contents, from which you can jump to any chapter. – The list of chapters is available for formatted documents, and in the plain text and formatted versions of Markdown documents.
- Task State
- If the current document is a task, an icon representing its state appears next to the title.
- Click the icon to change the task state.
- Click and hold the icon to set or clear its due date.
- ⑤ Toggle View
- Click this button to switch between formatted and plain text view. The color of the button indicates if you are currently viewing the default or the toggled view
- Formatted documents switch between formatted view and HTML source. Both views are editable.
- Markdown documents switch between plain text and formatted view.
- Plain text switches to formatted view also, where Notebooks applies Markdown conversion.
- ⑥ Process Actions
- This button reveals a menu of options to process the document, open it in a separate window, mark it as Favorite and more. The actions are detailed in a separate chapter.
Footer Button and Elements
- ⑦ Add new Documents
- Click the + icon to add a new document; select the document type from the menu.
- ⑧ Creation/Modification Date
- By default, the document’s modification date is shown in the center of the footer.
Click to toggle between creation date and modification date. - ⑨ Word and Character Count
- The counter shows the number of words and characters in the (editable) document, or the respective numbers of the currently selected text.
The green icon right next to the counter indicates live count. In this mode, the counter updates as you type. Click the green icon to turn off live count, in which case the numbers update when you open the document.