Formatted Documents
Notebooks‘ formatted documents are similar to documents you create in Apple Pages or MS Word: you can embed images, use headings, styles and tables, and, most importantly, you already see their final layout while typing. WYSIWYG style editing is the correct term for that.
In contrast to Word and Pages, Notebooks tries to remain light weight, with a focus on functionality that is essential for writing:
- Paragraph formats like title, subtitle, headings, paragraph, quotes and more
- Text styles like bold, italic, underline or struck through
- Text alignment – left, right, center, justified
- Numbered and bulleted lists as well as check lists
- Text highlighting in multiple colors
- Embedded photos
- Tables
- Table of Contents, etc.
Notebooks deliberately skips certain options like setting font, size or color for single words or phrases which would make documents more difficult to manage and maintain. Instead, we recommend taking advantage of styles, which allow you to change a document’s overall appearance with just a few taps or clicks.
Basics
Notebooks stores formatted documents as HTML, a flexible, universal format which was originally invented for creating websites. It is a format you can view on any device, so you can view Notebooks‘ documents on any device, too. By using HTML we keep Notebooks open, as documents are not locked into an app, and you can effortlessly use or reuse them in other apps and on other platforms. You can even edit those documents with HTML-capable applications like TextEdit, Word, Pages, NotePad etc.
Most of the functionality available for Notebooks‘ formatted documents is identical on macOS and iOS. A few details slightly differ, due to the nature of the operating systems and devices.
- To activate the keyboard and start writing, tap or click the text.
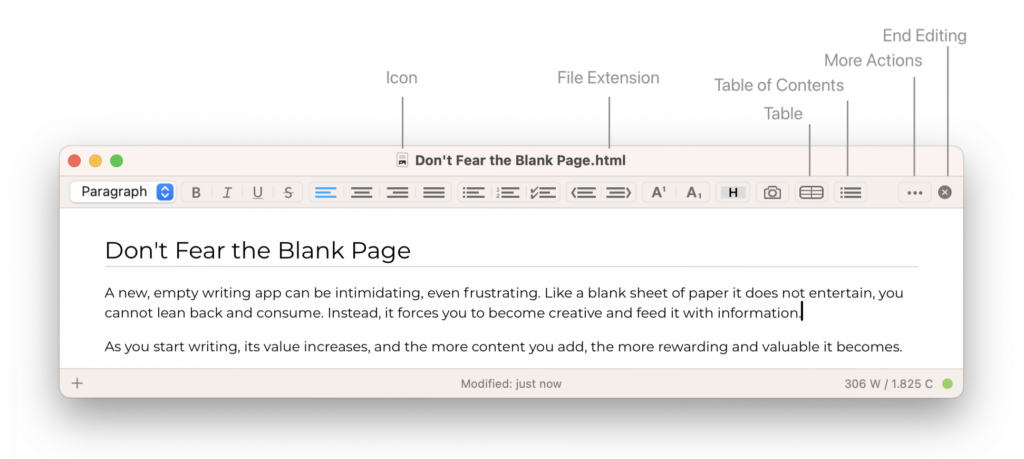
- Dedicated formatting buttons allows you to quickly assign styles and formats or insert images, links, timestamps or the current position. On iOS, the formatting buttons appear above the keyboard, and some options are available in the “cut/copy/paste” menu. On macOS the buttons appear at the top edge of the document window.
- To indent a list or paragraph, tap the indent button from the row of formatting buttons. Alternatively, use the Tab key on an external keyboard.
- To outdent, type return on an empty line, or tap the outdent button from the row of formatting buttons. On an external keyboard, type shift Tab.
- A live counter displays the total number of characters or words in the document. With text selected, the counter displays the number of selected words or characters. On a Mac you find this counter in the bottom right corner of the document window. On an iPhone or iPad, Notebooks displays the counter floating in the top right corner.
- Highlight a phrase or assign text color
- On an iPhone or iPad, this option is part of the “cut/copy/paste” menu (select a word or phrase and the menu pops up automatically). To remove color or highlight, just select Remove Format from the menu.
- On a Mac, you find these options as part of the formatting toolbar.
- End editing a formatted document
- On an iPhone or iPad, you can
- tap the Done button in the top right corner,
- swipe left or right across the text,
- use the dedicated dismiss keyboard button on an iPad,
- use Notebooks‘ dismiss keyboard button on the row of extra keyboard keys,
- with an external keyboard connected, type command-return.
- On a Mac, you can
- type command-return,
- or click the (x) at the right edge of the formatting toolbar.
- On an iPhone or iPad, you can
Extra Keyboard Keys on iPhone and iPad
To support editing when using the on screen keyboard, Notebooks features a row of customizable extra keys. It appears above the keyboard and is swipeable, so you can have an unlimited number or extra keys. You can learn more about extra keys in a separate section.
Keyboard Shortcuts for Formatted Documents
On a Mac and on an iPhone or iPad with an external keyboard connected, Notebooks provides a set of convenient keyboard shortcuts. You find more details in an extra section. On an iPhone or iPad, you can hold down the cmd key for a full list of shortcuts.
Document Style
A document style defines the overall appearance of your formatted documents. It describes the look of individual elements like title or sub title, lists, tables or images, and it includes settings for font, font size, hyphenation, line spacing and other attributes. You can learn more about document styles in a dedicated chapter.
By default, Notebooks applies its Default Theme to formatted documents. The document style is an inherited attribute, so you can choose a different style to be used globally, or for books or documents individually.
The document style is saved as part of a formatted document, which guarantees consistent appearance regardless of whether a document is displayed in Notebooks or in another app. When you open a formatted document, Notebooks dynamically updates the style to match your current settings, but it does not save any modifications yet. Notebooks embeds and saves the style only when you edit the document, as it would be unexpected and undesired if opening a document changed its modification date. This implies that changing a document’s style or attribute without editing its content may not immediately alter its appearance in Safari or Finder on Mac, for example.
To enforce an update of the embedded style without editing the document, you can use the dedicated action Apply Current Style, as detailed below.
Update the Embedded Document Style
As you edit a formatted document, Notebooks updates and saves the embedded document style automatically. To update and save the style without editing a document, you can use the dedicated action Apply Current Style. It is available from the current document’s action menu and in the document list’s context menu (right click an item in the list). You can also select multiple formatted documents from the list and apply the current style to all of them at once, which can be useful after changing your preferred font, for example, to make sure that it is embedded in your documents.
If you use your documents within Notebooks only, it is hardly ever necessary to explicitly update the embedded document style, as Notebooks does that on the fly.
Toolbar
Most of the toolbar buttons and actions are self explaining, like heading levels, bold, italic, lists, indent and outdent, text alignment etc. A few may require some extra documentation, so please read on.
Insert Photos
Inserting or embedding photos into formatted documents may be the most important option besides changing the text style. There are various options for adding images.
While photos appear embedded in a document, Notebooks actually stores them as separate files in a hidden subfolder NBImages. You may come across this folder through search or when viewing Notebooks‘ documents from other apps, but you do not need to care. Notebooks automatically manages these photos (or attachments, in general) for you, removing the ones which are no longer referenced. – If you don’t want Notebooks to remove unused attachments, you can turn this option off in Notebooks‘ settings.
Select from Album (iPhone & iPad)
Notebooks provides a dedicated Camera button in the formatting toolbar. Tap it for a menu with several options:
- Select from Album allows you to choose photos from your photo album and insert them into the document.
- With Use Camera you can take a photo and insert that into the document.
- After you copied a photo from your web browser or another app, the option Picture from Pasteboard inserts this photo.
- Depending on the content of the pasteboard, Notebooks may also show options to embed a PDF document, or embed items using their URL/link.
Choose File (Mac)
In Notebooks for Mac, the Camera button opens the file selector and allows you to choose photos to insert into the document.
Drag and Drop
In all versions of Notebooks, you can drag and drop photos into formatted documents. You can grab photos from a website, the Photos app, or any other apps, or—on a Mac—from a Finder window.
On Mac
When dragging a photo into a document on your Mac and the mouse pointer displays a (+) sign, you embed the photo into the document. If you hold down the option/alt key, the pointer turns into a curved arrow, and Notebooks inserts a link to the photo.
Copy / Paste
If you prefer copy/paste to drag and drop, you can of course use that, too. Select and copy one or more images in any app, switch to Notebooks, position the cursor in your document and paste the photos.
Instead of copying an image, you can also copy the link to an image and insert that. Notebooks detects when it is a link to a photo, so rather than adding the photo itself (saving it to the NBImages folder), Notebooks inserts the images by referencing it through that link.
Appearance of Embedded Photos
Size and alignment of images is controlled through the selected Document Style. The default style displays them centered and resized such that they never expand beyond the screen, but you can choose a different style or adjust the style for different layout.
Insert and Modify Tables
- The actions to insert a table and to manipulate its rows and columns are summarized in the Table button.
- Click or tap that button when it is not highlighted to insert a table at the current position.
- For a menu of options to insert or remove rows or columns, click or tap the button when the cursor is in a table cell.
Table of Contents
- Tap or click the Table of Contents (ToC) button to insert the table of contents at the current position. Notebooks uses the titles, chapters and sections to build the ToC.
- The ToC updates automatically as you edit the text.
- You can add only one ToC per document. So once the document contains a ToC, the button in highlighted, and clicking or tapping it again removes the ToC.
- The button is inactive (not clickable or tappable) when the document does not contain any headings.
Insert and Edit Links
Linking between documents in Notebooks or adding links to external resources is an important part of compiling research material, building a personal library or just keeping a diary. The types of links and references supported by Notebooks are detailed in a separate chapter. Here we concentrate on how to add links to formatted documents.
Drag and Drop Items to Create Links
One of the easiest way to link between documents in Notebooks is to grab one document and drop it into the body of another document. By default, Notebooks uses the dropped document’s title as text for the link, but you can of course change the title later.
On iPhone & iPad
- Tap and hold a document in the list, then start to drag.
- Drag the document over the document you want to add the link to, and wait until it opens; never lift your finger while you do that.
- Then keep dragging until the cursor appears at the correct position and lift the finger. Notebooks inserts the link to the dropped document, taking its title as text for the link.
On Mac
- It is best to start by opening the document into which you want to interest the link.
- Then grab the document from the list and drop it into the open document.
- Please keep an eye on the mouse pointer before dropping the document:
- If it shows a + sign, Notebooks adds the contents of the dragged item.
- You may need to hold down the
altkey to change the pointer to a curved arrow, which indicates that Notebooks adds a link.
Drag and Drop URLs
Just as you can drag and drop items, you can grab any link from a web browser or any other app and drop it into a formatted document. Notebooks insert a beautified version of the link, using the link’s designated title as text, and adding the link’s URL as address. – If you want to insert the link’s URL as visible text, it is better to copy the URL and use Paste and Match Style, or use the method below.
Copy and Paste Links
Another quick option to add links is to first copy them from a Notebooks document, a web page, or another app, and then paste it into a formatted document.
- A regular Paste (
cmd-V) inserts a beautified version of the URL, taking the URL’s last component (usually the title or filename) as title. When using a link to a Notebooks document, this will be the document’s title. - If you want to insert the URL as it is, but as a clickable link, select the title which Notebooks just added, and use Paste and Match Style to replace it with the full URL.
- Alternatively, you can use Paste and Match Style first, which adds the URL as plain text, then select the URL and use Insert Link (or type
cmd-Kon a Mac).
To get the link of one of your Notebooks documents, use the Copy Link action, which is available from multiple menus.
Turn Phrases into Links
The methods above add links to your text, and you can change the title later. Here is how to add a link to an existing word or phrase:
- Start by copying a link to a Notebooks document, a URL from a web browser or any other app.
- Select the word or phrase you want to turn into a link.
- The next steps depend on the device you use:
On iPhone & iPad
- Tap ••• on the row of extra keyboard keys and choose Insert Link. (This option is available only if you copied a valid link first.)
- Depending on the link you copied, you may also find the option Insert Object from Link here, which allows you to embed photos or PDF documents.
On Mac
- Click the ••• button in the toolbar and choose URL or, even faster, type
cmd-K. - A dialog appears which allows you to add or edit the link’s URL, with the link you copied filled in as default.
To edit a link’s URL at a later stage, select the link’s text and type cmd-K. The same dialog appears, with the link’s URL filled in, allowing you to modify or remove the link.
Current Position / Location
On devices supporting location services, Notebooks offers an option to insert the current GPS position into your document. The result is a map preview along with the exact GPS coordinates, a timestamp, and—if possible—the resolved address of your current location.
You can also copy a GPS location from the Maps app, for example, and paste that into a formatted document. Notebooks detects that you copied a location and will try to insert a map preview as above.
Notebooks for iPhone and iPad allows you to add the current position from a book’s +-menu as well, so you don’t need to open or create a new document first.
Soft Return
When using lists or indented paragraphs, typing return usually starts a new list bullet or a new paragraph. However, there may be cases when you want to continue your text on a new line, but without starting a new bullet or paragraph. This is where soft return comes into play, as it allows you to add a line break without starting a new paragraph.
On iPhone & iPad
When set up, your row of extra keyboard keys may offer a dedicated soft return key. Tap it to insert a soft return. Alternatively, you can use the action from the ••• menu.
On Mac
As common for macOS apps, you can type shift-return to enter a soft return at the current position.
Page Break
Notebooks‘ formatted documents are based on HTML, so there is no concept of a “page size” as in dedicated word processing applications. Instead, the document adjusts to the size of the screen and reflows as needed. When printing a document, however, it may be important to have some control, at least as far as page breaks are concerned. So you can use the Page Break action whenever you want to start a new page.
Page breaks have an effect only when printing a document or when converting it to PDF. On screen, Notebooks displays a visual hint only.
Horizontal Line
Use the Horizontal Line to introduce a thematic break in your text.
More Actions •••
Notebooks‘ formatting bar also features a ••• button which opens a menu with additional, less frequently used actions. They are also context sensitive, meaning that they can change depending on the content of the pasteboard, or—especially on your Mac—depending on the window’s width.
Specific Settings for Formatted Documents
Notebooks provides several settings to adjust and enhance your writing experience in formatted documents. You find them in Settings > Write and Edit > Formatted Documents on your iPhone and iPad, in Settings > Editing > Formatted on your Mac.
How to Fix Layout Issues
As you work on a formatted document over an extended period of time, adding and changing text or pasting content from other sources, you may start seeing layout inconsistencies. They may manifest as random fonts or colors, incorrect paragraph spacing, or irregular layout in general. These anomalies are inherent to editable HTML, but they are usually easy to resolve.
Pasting Text into Formatted Documents
Pasting text from other sources is one of the most likely reasons for layout issues. When you copy text from a web site, for example, and paste it into a formatted document, Notebooks by default pastes the text as it appears on the website: the same font, style, colors, spacing etc. The result looks pretty much like the original, but maybe this is not what you want, as the text does not adopt Notebooks‘ document style.
- A regular Paste inserts text as it is, including its custom style info.
- Use Paste and Match Style to avoid extra styles, thus making sure that the pasted text adopts Notebooks‘ style and appearance.
When you copy a URL and Paste it into a formatted document, Notebooks inserts a beautified version of the URL, taking the URL’s last component (usually the title or filename) as title. If you want to insert the URL as it is, but as a clickable link, select this title and use Paste and Match Style to replace it with the full URL.
Reset Format of Selected Text
You can remove extra styles after the fact by highlight text in a formatted document and selecting Remove Format. You find this action in the popup/edit menu on your iPhone or iPad, or in the context menu (right click) on your Mac.
Reset the Document’s Format
- To remove extra style info from the entire text, use Clean up Document… from the document’s action menu. This option may be unavailable if the document has already been cleaned up.
- The action Apply Current Style cleans up the document and also updates the embedded document style. This is especially convenient if you add an HTML document from elsewhere and want it to adop Notebooks‘ style.